

Key Takeaways
- Most running toilets are caused by a worn flapper, a misadjusted float, or a failing fill valve.
- A running toilet can waste 200 or more gallons of water per day if left unaddressed.
- You can diagnose the specific cause in under five minutes using simple household methods.
- Most repairs require only basic tools and inexpensive parts available at hardware stores.
- Knowing when to call a plumber - versus fixing it yourself - saves time and avoids costly mistakes.
What you will need
Why a Running Toilet Deserves Prompt Attention
A toilet that runs continuously isn't just an annoyance - it's a measurable drain on your water bill. Depending on the severity of the leak, a running toilet can waste anywhere from 30 gallons to well over 200 gallons per day. Over the course of a month, that adds up quickly, and the underlying cause rarely resolves on its own.
The good news is that the vast majority of running toilet problems trace back to three components: the flapper, the float, or the fill valve. All three are inexpensive, widely available, and replaceable without professional help in most cases. Understanding which part is responsible - and why - makes the fix straightforward rather than intimidating.
Ignoring the problem, on the other hand, tends to compound it. As noted in our guide on what makes simple repairs expensive, delays and deferred maintenance consistently inflate the final cost of common home fixes. A $10 flapper left unaddressed becomes a higher water bill and, occasionally, a corroded valve seat that requires more significant repair.
What you will need
What Each Component Does - and How It Fails
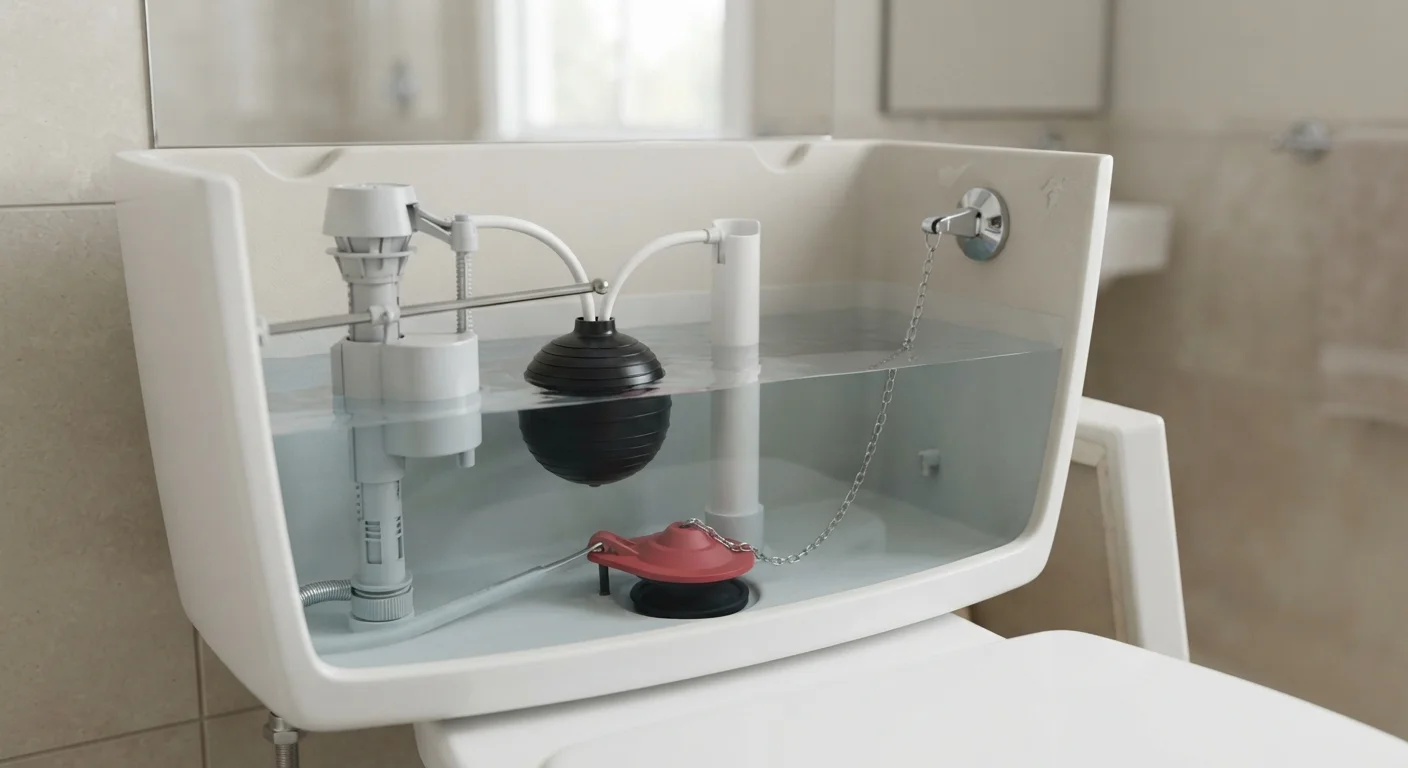
The toilet tank operates as a self-regulating system. When you flush, the flapper lifts to release stored water into the bowl. As the tank drains, the float drops with the water level, triggering the fill valve to open and refill the tank. When the water rises back to its set level, the float signals the fill valve to close. When any part of this cycle breaks down, water keeps moving when it shouldn't.
- Flapper: Made of rubber, it degrades over time from chlorine in the water supply, age, and mineral deposits. A worn flapper won't seal tightly, allowing water to trickle silently from the tank into the bowl.
- Float: If set too high, the water level in the tank exceeds the overflow tube height and drains continuously into the bowl - a different failure mode than the flapper, but an equally wasteful one.
- Fill valve: After years of use, the internal seal inside the fill valve can wear out, causing it to run even when the float signals it to stop.
For toilet issues that go beyond the tank - such as leaks at the base or a rocking fixture - toilet flange repair is a separate and more involved category of fix.
Always Shut Off the Water First
Before opening the tank or removing any components, turn the shut-off valve located behind or beneath the toilet fully clockwise. Skipping this step can result in water spraying uncontrollably. If the valve is stuck or corroded and won't turn, stop and contact a licensed plumber rather than forcing it.
Tools and Parts You'll Need
Before starting, confirm which component needs attention based on your diagnosis in Step 1. That way you're buying only what you need rather than a full repair kit you may not use. Most hardware stores stock individual flappers, fill valves, and float assemblies in the plumbing aisle.
Adjustable pliers or slip-joint pliers
Used to loosen and tighten water supply line fittings and fill valve lock nuts.
Replacement flapper
Replaces a worn or warped flapper that allows water to leak continuously into the bowl.
Replacement fill valve
Replaces a failing fill valve that won't shut off water once the tank reaches capacity.
Food coloring or dye tablet
Dropped into the tank to confirm whether water is silently leaking past the flapper into the bowl.
Small sponge or towel
Absorbs residual water at the bottom of the tank during repair.
Bring Old Parts to the Hardware Store
Toilet tank parts aren't fully standardized across manufacturers. Taking the old flapper or fill valve with you makes it much easier to find a compatible replacement. When in doubt, look for a universal-fit flapper that lists your toilet brand on the packaging.
Step-by-Step: Making the Repair
Follow each step in order. If you complete a step and the issue appears resolved, you can re-test before continuing to the next - there's no need to replace every component if the problem is isolated.
Diagnose the cause before touching anything
Remove the tank lid and set it safely aside on a flat surface. Listen and look. If water is trickling into the bowl, the flapper is likely the culprit. If water is running out of the overflow tube - the tall vertical tube in the center of the tank - the float is set too high. Drop a few drops of food coloring into the tank without flushing; if color appears in the bowl within 10-15 minutes, the flapper isn't sealing properly.
Shut off the water supply
Turn the shut-off valve clockwise until it stops. Flush the toilet once to drain most of the water from the tank. Use a sponge to soak up any remaining water at the bottom. This makes it easier - and less messy - to handle and inspect components.
Inspect and replace the flapper
The flapper is the rubber seal at the bottom of the tank that lifts when you flush and drops back to hold water. Unhook it from the ears on the overflow tube and disconnect the chain from the flush handle arm. Examine the flapper for warping, mineral buildup, or a cracked rubber edge. If it feels stiff or looks misshapen, replace it. Snap the new flapper onto the overflow tube ears, reattach the chain with roughly half an inch of slack, and restore the water supply to test the seal.
Adjust or replace the float
If water was running over the overflow tube, the float is positioned too high, meaning the fill valve never gets the signal to stop. On a ball-float style (older style with a round ball on an arm), bend the arm slightly downward or adjust its set screw to lower the target water level. On a cup-float style (a cylinder that slides up and down the fill valve), pinch the clip or turn the adjustment screw counterclockwise to lower the float. The water level should sit about one inch below the top of the overflow tube.
Replace the fill valve if needed
If the fill valve hisses continuously or water keeps running despite a good flapper and properly adjusted float, the fill valve itself may be worn. Shut off water, flush, and sponge the tank dry. Use pliers to disconnect the supply line from the bottom of the tank, then unscrew the fill valve's lock nut (also from underneath). Lift out the old valve, insert the replacement according to its instructions, and set the new float height before reconnecting the supply line. Turn on the water slowly and monitor for leaks at the connection point.
Test and confirm the fix
Restore the water supply fully and allow the tank to fill. Once filled, listen for any continued running sounds. Repeat the food-coloring test to confirm no water is seeping past the flapper. Flush two or three times and watch that the tank refills to the correct level and stops cleanly. Replace the tank lid only after you're satisfied the system is working correctly.
Old Parts Can Be Brittle
In older toilets, plastic and rubber components may be fragile from age. Handle the fill valve, float arm, and flush valve seat carefully to avoid cracking them. Damaging a secondary component can turn a simple flapper swap into a more involved repair - and a more expensive one.
Once the repair is complete and confirmed, you may want to address other common bathroom maintenance tasks. Clearing a slow drain is another straightforward repair that follows a similar diagnose-first approach.